It’s the same with photography. If your camera is in Auto mode, Program mode, Shutter Priority mode, or Aperture Priority mode, you’re letting it choose the settings. But it doesn’t know what kind of picture you want. You end up with a compromise—a terrible decision reached on your behalf because the camera doesn’t have all the information. In auto mode, the camera may think 1/100 s at f/16 is the same as 1/800 s at f/5.6 because the exposure value is the same. But you get a very different picture—especially if you’re trying to take a shot of a cheetah sprinting at 70mph! If you learn manual mode, you can still get the correct exposure but keep control of the shutter speed, aperture, and ISO. [ExpertPhotography is supported by readers. Product links on ExpertPhotography are referral links. If you use one of these and buy something, we make a little bit of money. Need more info? See how it all works here.]
Why and How to Shoot in Manual Mode
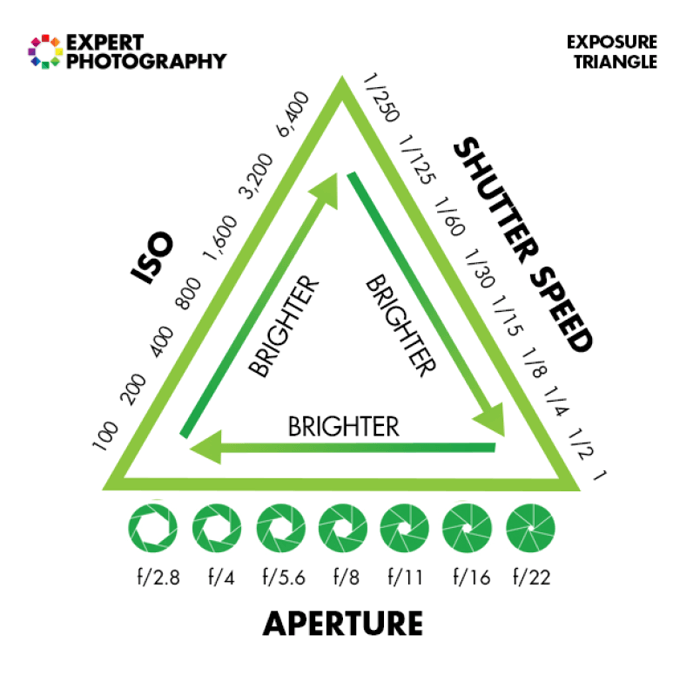
It’s tempting to let the camera pick the lens aperture, shutter speed, and ISO in auto mode. But when you shoot in Program mode, Shutter Priority mode, or Aperture Priority mode, the camera will choose settings you don’t want. And that’ll make it harder to get the shots you want. I suggest starting with Manual mode and automatic ISO. That lets you keep control of the basic settings of shutter speed and aperture while allowing the camera to work out the proper exposure. Let’s look at “The Exposure Triangle.” It consists of the manual mode settings of aperture, ISO, and shutter speed.
Manual Mode Settings
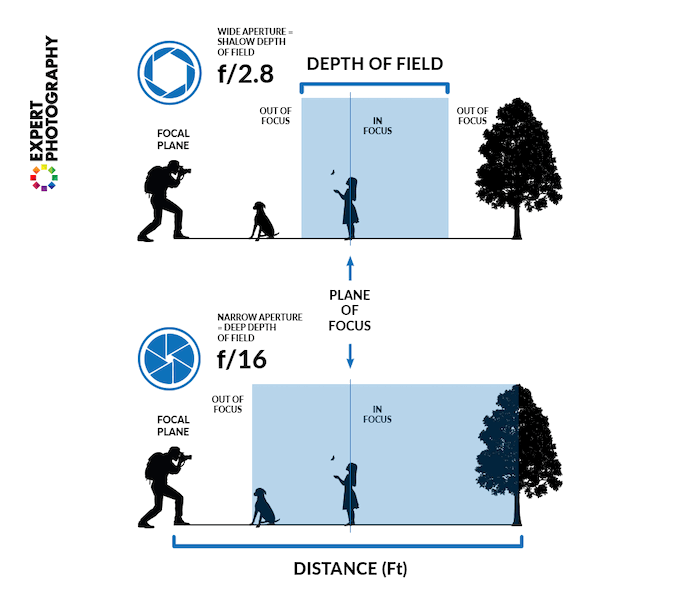
Aperture controls the depth of field, which is the amount of the scene that’s “acceptably sharp.” The wider the aperture, the narrower the depth of field. Shutter speed controls the amount of blur caused by camera shake or subject movement. The faster the shutter speed, the sharper the image. ISO controls the amount of “noise” or grain (in film terms), which is just a lack of smoothness. The lower the ISO, the smoother the image.
These directly influence how bright the image is. But they also control sharpness and noise. Aperture and shutter speed are the most essential “artistic” tools at your disposal. Noise is not usually a big deal. You can fix it using noise reduction software such as Topaz Labs DeNoise. But the depth of field and motion blur are crucial to any image—you have to get them right in the camera. And that’s why you can use automatic ISO. But you don’t want the camera messing with your aperture or shutter speed!
What is Aperture?
The aperture is a hole inside your lens created by several rotating blades. It acts like the “iris” in your eyes by opening and closing to allow more or less light, depending on light levels. The unit used to measure the aperture is called the f-stop (focal ratio or f-ratio or f-number). It’s the focal length divided by what’s called the “entrance pupil.” It’s not the aperture itself but where the aperture appears to be if you look through the front of the lens. Unfortunately, there isn’t a straightforward sequence of aperture values. The most common ones are f/2.8, f/4, f/5.6, f/8, f/11, f/16, and f/22. The gap between each f-stop setting consists of one exposure value (EV). That means the light reaching the sensor doubles if the f-number falls. Or it halves if the f-number rises. Most cameras let you change the aperture by a third of a stop. So you can imagine how complicated the numbers get! Wide-angle lenses tend to have larger maximum apertures because if you halve the focal length, the f-stop also halves. Lenses with a wide maximum aperture such as f/2.8 or lower are called “fast.” That’s a good thing if you’re shooting in low light or want to separate the subject from the background by minimizing the depth of field. But the sharpest f-stop for a given lens might be f/5.6 or f/8. On the other hand, longer lenses and zooms tend to have smaller maximum apertures, such as f/5.6 or higher. That’s not great if you’re a wildlife or sports photographer. The”fastest” telephoto lenses are so hard to make that they’re often costly.
How to Set Aperture
A narrow aperture, such as f/16, will keep almost everything in focus as it has a large depth of field. It’s most useful for landscape photographers, who might use a narrow aperture to show as much detail as possible in both the foreground and background. But there’s always a limit to sharpness. With f-numbers higher than f/22, you start to get diffraction effects. When that happens, the finer details won’t be sharp anymore.
What is Shutter Speed?
The shutter speed (or time value) is the amount of time your camera’s shutter stays open during an exposure. The longer it is, the more light enters the camera, and the brighter your image will be. Shutter speed is shown in seconds. And most modern DSLR cameras have settings of 30 seconds to around 1/8000 s. The good thing about this system—it’s easy to work out the exposure impact of changing the shutter speed. Each doubling of the time doubles the amount of light reaching the sensor. That means a doubling of the image brightness. A typical sequence of one exposure value (EV) intervals might be 1/100, 1/200, and 1/400 s. Just be aware that some of the available values have been rounded, so 1/125 s comes after 1/60 s!
How to Set Shutter Speed
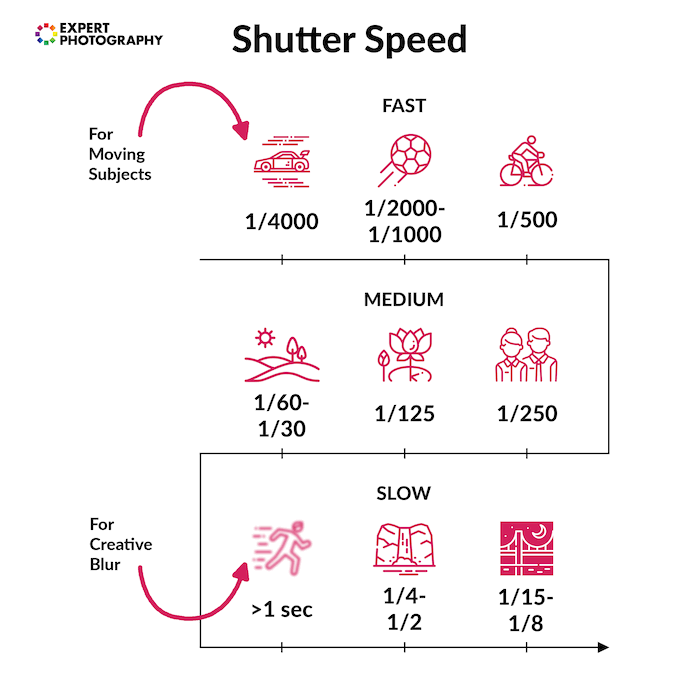
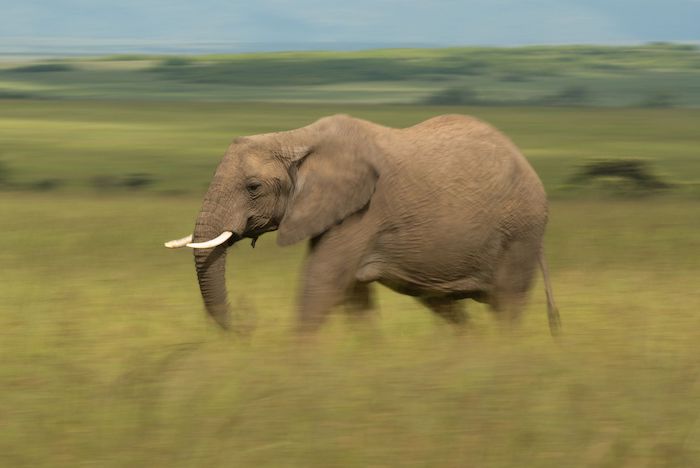
A faster shutter speed means you need a higher ISO. But you get a sharper image because a moving subject is “frozen.” A slower shutter speed means a lower ISO but more motion blur. Neither approach is “right” or “wrong.” It’s just a matter of personal taste.
What is ISO?
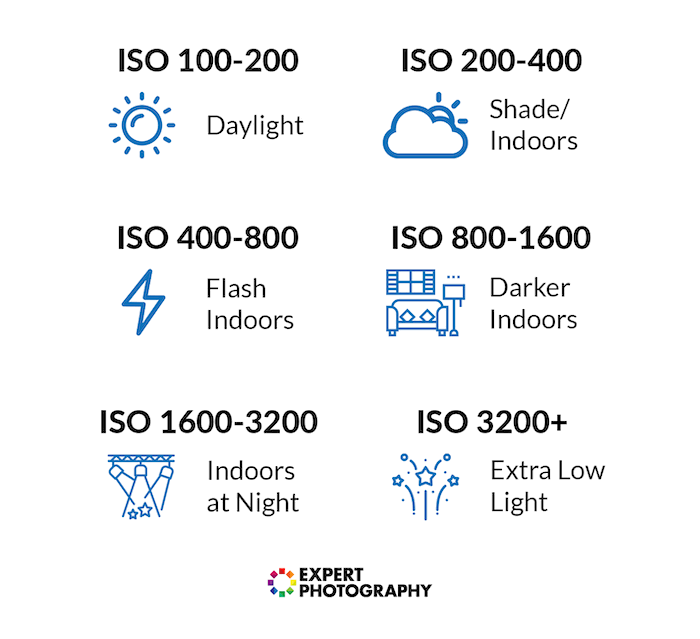
Some people think ISO stands for International Standards Organization. But there’s no such thing! It’s just a made-up name adopted by the International Organization for Standardization to be the same in different languages. ISO is based on the Greek word isos, meaning “equal.” It’s often said that the ISO of a digital camera is the “sensitivity” of the sensor. But that’s not quite right. Strictly speaking, ISO is the Exposure Index (EI) setting. It’s manipulated by changing the sensor’s signal gain before conversion to digital. The idea is to match the old film speeds as closely as possible. The base value in most cameras is typically 100 ISO. The upper limit is getting higher and higher. The Nikon D850 now supports 25600 ISO (expandable to over 102400). But that’s a pretty expensive full frame DSLR.
How to Set ISO
The lower the ISO number, the better the image quality is in smoothness, contrast, and color rendition. So it’s a good idea to keep it as low as possible. But there’s a trade-off. If you’re working in low light, you need the extra brightness from a higher ISO. You have to balance brightness with image quality.
You start to see significant noise beyond 6400 ISO as a general rule. So that’s when you might want to use a wider aperture or longer shutter speed. But it depends on your camera. Modern, full frame cameras perform much better at high ISOs than older models.
Problems Using Auto ISO—and Solutions
People are often scared to shoot in manual mode. So using automatic ISO is an excellent way of letting the camera worry about getting the proper exposure. But be careful… don’t rely on it too much.
Problem #1
One problem with automatic ISO is that it only works within a “relevant range.” If it’s getting brighter and brighter and you’re already shooting at 100 ISO, then the camera has nowhere to go. If you choose a narrower aperture or higher shutter speed, your pictures will be overexposed. The same might happen if it’s getting dark and you’re worried about noise. If you’re already shooting wide open, all you can do is choose a longer shutter speed—but that won’t work if your subject is moving.
Solution
Some cameras let you set a maximum ISO, but I don’t recommend it. Even a noisy shot is better than no shot at all! The best solution is to change the shot type—by trying a slow pan, for instance. Or you can take more and more pictures as your shutter speed gets slower and slower. For example, start with a fast shutter speed if you want a sharp portrait at the lowest possible ISO. Then work your way down, taking more and more shots at each setting. For example, if your estimated “hit rate” at a slow shutter speed like 1/60 s is only one in ten, you probably need to take a short burst. As your shutter speed gets slower and your hit rate goes down, you have to take longer and longer bursts at slower and slower shutter speeds. You only need one keeper, so make certain probability is on your side!
Problem #2
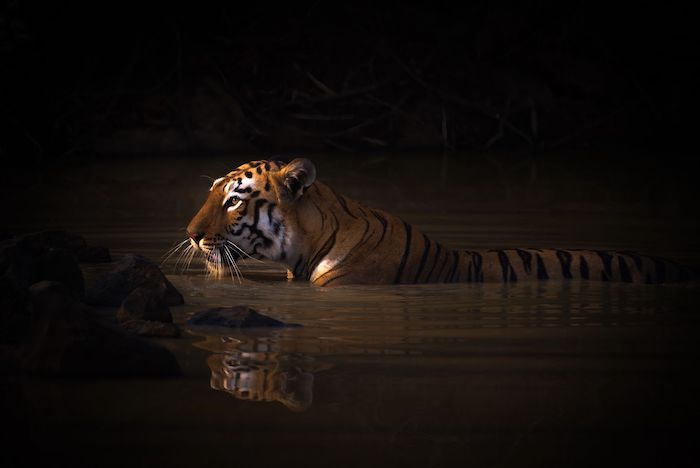
Another problem with automatic ISO is that the camera doesn’t “know” what’s in front of it. Manufacturers cope with that by programming the firmware to expect the scene to reflect 18% of the light. It’s a good rule of thumb, but it won’t work all the time. What if you’re shooting a polar bear on an iceberg? In that case, the camera is fooled into darkening the ice to a murky grey because that’s the only way it can achieve its 18% target. Or what if you’re shooting a black panther in a forest? The camera will brighten the scene until the animal appears washed out. So what’s the solution? There are two ways of coping with this. The first is to use exposure compensation, and the second is to go “full manual.”
Solution #1—Use Exposure Compensation
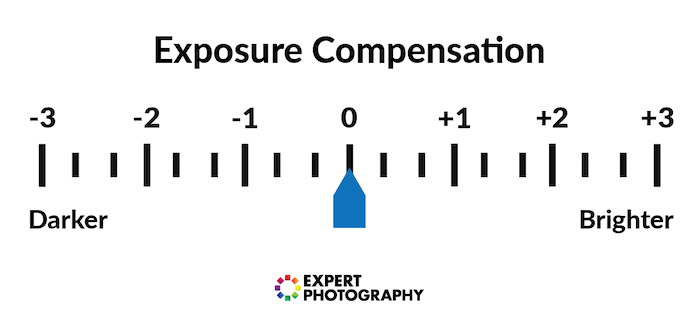
The exposure compensation dial is a way of artificially brightening or darkening your images depending on the scene:
If it’s a bright scene, add one or two stops of positive exposure compensation. If it’s a dark scene, add one or two stops of negative exposure compensation.
That should solve the problem. You can also use the dial to underexpose or overexpose deliberately to create a low-key or high-key portrait.
Solution #2—Shoot in Full Manual Mode
The alternative to using automatic ISO is to shoot in full manual mode. That means setting the aperture, shutter speed, and ISO yourself. Then you use the camera’s built-in light meter to check the exposure. The meter display shows a line of numbers in the viewfinder. It generally runs from -2 through zero to +2. When the arrow is on zero, your photo should be properly exposed. If it’s a negative number, you will underexpose by that number of stops. If it’s a positive number, it will be overexposed. The effect is the same as using automatic ISO with exposure compensation. But now, you change all your exposure settings manually. It gives you even greater flexibility in taking the shots you want.
Conclusion
I hope that covers everything about how to shoot in manual mode. I know it can feel a little scary. But using automatic ISO guarantees proper exposure. That means you’re free to concentrate on composition and the critical camera settings—your aperture and shutter speed. And if your images do get too dark or bright, you can always use exposure compensation or experiment with full manual mode. It might seem like a leap into the unknown. But you’ll be shooting confidently in manual mode in no time! Try out our Photography for Beginners course to learn more about proper manual camera settings!
