If you’re unfamiliar with Luminar Neo, you need to continue reading this review. We’ll show you all the main features. And we’ll answer some of the hottest questions surrounding the software in this review. Who is it for? How does it compare to Luminar AI? And what are the features in Neo 1.1? If you’re still on the fence about it, we’ll help you make up your mind. And if you weren’t convinced before, we think the updated Luminar NEO 1.1 might sway you to the purchasing side.
What is Luminar Neo?
Luminar Neo is an AI-powered photo editing software from Skylum. Skylum has said that Neo isn’t replacing their previous release—Luminar AI. But Neo sets out to fix some of the issues users faced with Luminar AI. Skylum is using AI to streamline the photo editing process. Power line and Sky Replacement AI tools have turned tedious and time-consuming tasks into one-click operations. There are features to improve portraits, a Relight AI, and dozens of presets for easy improvements. Luminar Neo is a new software from Skylum. And it hasn’t yet reached its final form. But with each update, a new piece of the puzzle is added. They’re adding new tools to make Luminar NEO a distinct improvement from their previous software products. We were impressed with the AI tools in Luminar AI. But like many others, we encountered performance issues. Luminar NEO offers the same AI tools, but the new high-speed core engine improves speed and performance. Luminar Neo isn’t just more of the same. We’re happy to see Skylum has taken Neo in a different direction, adding layer and mask AI tools to the program. This broadens Neo’s appeal, taking it in an Adobe Photoshop direction.
What’s New in the Updated Luminar NEO 1.1?
The first responses to Luminar NEO were positive. But the puzzle wasn’t yet complete. A few of the core editing tools promised by Skylum were still missing. But now Luminar NEO has been updated to Neo 1.1 And new pieces of the puzzle have been added. The mask AI tool is the headline feature of the updated version. Masking was a big promise during the buildup to Luminar Neo’s release. And many were disappointed not to see it in the original public version. But here it is. And we think it was worth the wait. The Mask AI sets Luminar NEO apart from Skylum’s previous products. Luminar AI had many of the AI features found in Neo, like sky replacement. But the masking options take Neo to a whole new level. The new masking tools put more control in the hands of the editor. You can localize your edits. But the AI technology makes editing photos fast and painless. We’ll go into more detail in the Mask AI section below. The latest release gives us one of the features editors have been eager to get their hands on. The Portrait Background Removal AI has finally made it to the Luminar NEO toolbox. It’s another AI toolset to revolutionize photo editing. Does it succeed? Keep reading for our verdict. You also get a histogram for more detailed editing. It was a bit of a surprise that this was left out of the original release. But we’re happy to see a histogram in the latest version.
Who is Luminar NEO For?
Luminar Neo’s AI tools are powerful, and the new overlay features give the program broad appeal. Photographers from lower-level enthusiasts to seasoned professionals will love Luminar Neo. The AI templates and modes are perfect for social media content creators. Luminar NEO makes it easy to transform dull and drab photos into algorithm-busting images. Luminar Neo’s AI tools are sophisticated enough for high-end photo editing. The relight AI and portrait tools are excellent for fashion and editorial photography. Luminar NEO will help professional photographers prepare their photos for publication. One of the main attractions is the AI clean-up tool. Luminar NEO can remove dust spots and power lines from your photos. And as the tool is AI, this takes just a few clicks of your mouse. By eliminating these tedious tasks, Neo can save photographers time and money. Reading this, you might think you’re better off sticking with Luminar AI. But Neo ventures into the world of creative image manipulation. Skylum is trying to steal a slice of this Photoshop-dominated pie. And the mask and layer tools open Neo to a new audience. Like Luminar AI, Neo is for serious photographers and photo editors. The AI-powered tools streamline the editing process without sacrificing quality. And the new editing tools bring other digital artists into the Skylum fold.
The Key Features of Luminar Neo
Since Luminar NEO was announced, Skylum has made some eyebrow-raising promises. They wanted the public to know about the new and improved features they’d find in Luminar Neo. This Luminar NEO review will now look at those features. And I’m happy to say, Skylum wasn’t far off the mark with their claims. We’ll take a look at where they’ve delivered their promises for the Luminar NEO features. We’ll look at the new core engine, the interface, and some of the main AI image editing tools. These include sky replacement, power line removal, and portrait bokeh. And we’ll show you some examples of the presets from the Luminar NEO catalog. We’ll also give you a run-through of the new features from the latest update. There’s a section on the new Mask AI tool and Portrait Background Removal AI, so you’ll be up to date with the latest version of Luminar Neo. There are more updates to come. And you won’t miss out if you buy Luminar NEO now. All future updates will be added automatically and free of charge. You simply update the software when the new version becomes available.
The Core Engine
Rather than tinker with the Luminar AI engine, the Skylum team developed a brand new one for Neo. The new Luminar NEO engine is “modular.” This means that each editing area has a separate processor for better optimization. Luminar AI was easily overloaded. If you applied too many effects, the performance would suffer. The system would become glitchy and wouldn’t display the adjustments. Luminar Neo’s new core engine makes a big difference. Changes are applied quickly. And Luminar NEO has a much smoother operation than previous software. However, with each software update, Luminar NEO slows down slightly. There’s more of a delay when adding effects and layers. And the computer is clearly doing more work to keep the program running. We’re only talking about a second or two, but there is a difference.
RAW File Editing
RAW file capabilities aren’t headlining news. Any professional photography software should have them. But it’s worth mentioning for photographers that are new to Skylum products. You can rest easy knowing that Neo can handle RAW files.
Luminar Neo Interface
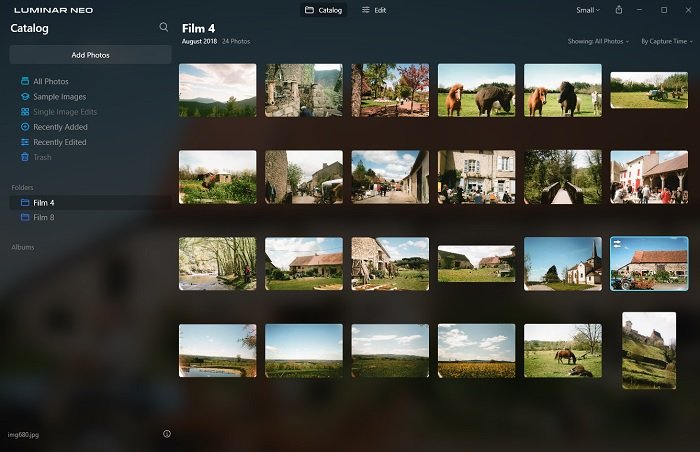
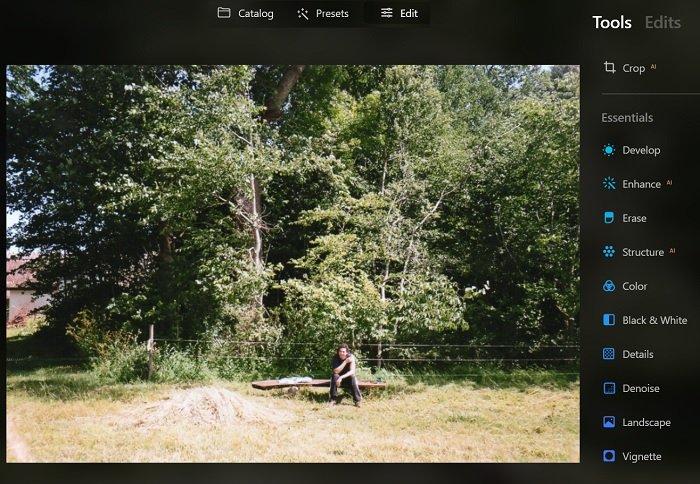
The Luminar NEO interface is excellent. It looks clear, uncluttered, and easy to navigate. All the tools are readily available, with nothing hidden away in a maze of menus. The catalog view displays your photos in a thumbnail format, making it easy to find the image you want to edit. And adding more from external libraries is straightforward. Simply click on “Add Photos,” and you’re given the option of uploading an entire folder or a single photo. Select the album or photo you want to import, and it appears in your Neo Library. To edit a photo, select the photo in your library and click on the “Edit” option at the top of the window. It’ll take you to the edit module, and you’ll have all the editing tools listed on the right side of the screen. The slide bars make applying the adjustments simple. And some of the AI tools work with just one click. These are advanced editing tools. But Luminar NEO is incredibly accessible, even to novice editors.
Power Line Removal AI
The AI-powered Erase tool has been one of the headline features throughout the pre-release campaign. Skylum was keen to let us know that Luminar NEO would be able to remove dust spots and power lines with the click of a button. We were impressed with the standard of the Power Line Removal tool in the early access package. It was quick, and the results were pleasing. And we’re happy to see that the positive results have continued into the full software. We started with something simple. Our first image only has a few visible power lines. They’re thick and clearly defined against the sky and the roof of the barn. I clicked the Remove Power Lines option in the Erase tool dropdown box. And the black lines were gone. It was as simple as one click of the mouse. Impressive. But that was just the first test, with a few clear power lines in the image. Our second picture was a bit more complicated. We have a crossroads scene with many overhead power lines. To make things more complicated, the cables cross the lines of the building and windows. There’s a lot of information the AI tool has to process.
This was a more formidable challenge, but I have to say, Luminar NEO met the challenge head-on. And the results are strong. The power lines are gone, and there are no signs of warping or distortion. Some of the fainter and more distant lines remained when we zoomed in. But you have to go looking for them. And the Brush tool takes care of them quickly. The Erase AI tool is fast and accurate. It identified what it needed to. And it removed the lines with minimal damage to the image. There are very few signs of distortion, and your image remains clean. It’s as if they were never there. This AI feature is quick. The process takes no more than a couple of seconds, and the results are excellent. It’s outstanding for a one-click operation. This tool will spare photographers the grief of doing this manually.
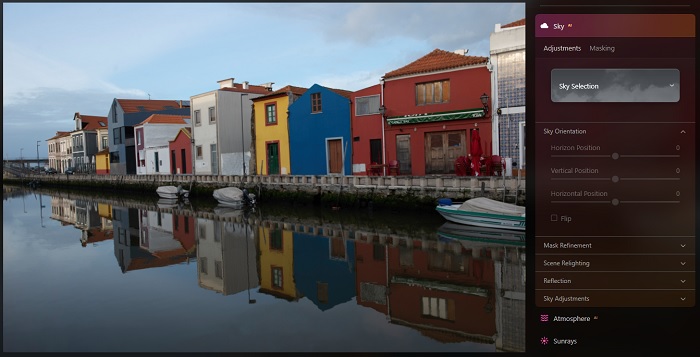
Sky Replacement AI
The Sky Replacement AI was another standout feature in the pre-release package of Neo. It was fast, and the results were great. This image wasn’t too tricky. The roofs of the buildings clearly define the skyline. And when the AI replaced the sky, the skyline remained clear, without any overlap or smudging. <img class=“aligncenter wp-image-771241 size-full” src=“https://expertphotography.com/wp-content/uploads/2022/05/Luminar-Neo-Review-Sky-Replacement-Water-Dropdown.jpg" alt=“Screenshot of Luminar NEO with sky replacement AI tool box” width=”700″ height=”357″ /> But what impressed us was the water. The AI changed the sky as expected, but it also changed the reflection of the sky in the water. That shows real intelligence, and it saves time instead of having to make that change manually. The Sky Replacement AI is a feature in Luminar AI. And we thought it was good in that Skylum product. But as promised, the same feature in Neo performs even better. Using it only takes a second, and there’s no sign of struggle from the operating system.
Mask AI
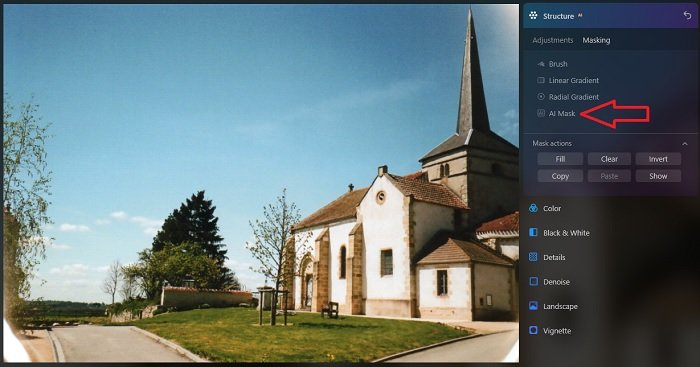
Skylum’s announcement that Luminar NEO would have AI masking was a big deal at the time. A Mask AI tool was something no previous Skylum software had. And while it was disappointing not seeing the new tool in the original release, we’re happy to have it in the updated version. The Mask AI tool aims to speed up the masking process. The AI tool identifies different elements within your photo and highlights them automatically. You no longer have to spend ages with the brush highlighting areas manually. You also have manual masking tools. You have options for Linear Gradient, Radial Gradient, and the Brush tool for more precision adjustments. But we’ll mainly look at the AI tool in this section. I’m using the masking in the Structure AI tool for this example. That’s because the changes will display clearly. But you have masking options in most of the tools in the Luminar NEO arsenal. The Mask AI looks for and identifies eight different elements. They are human, flora, water, mountains, architecture, transport, natural ground, and man-made ground. Once these elements have been identified by the Mask AI tool, click on the one you want to edit, and it highlights the area in red. Any adjustments you make will then be applied to the red area.
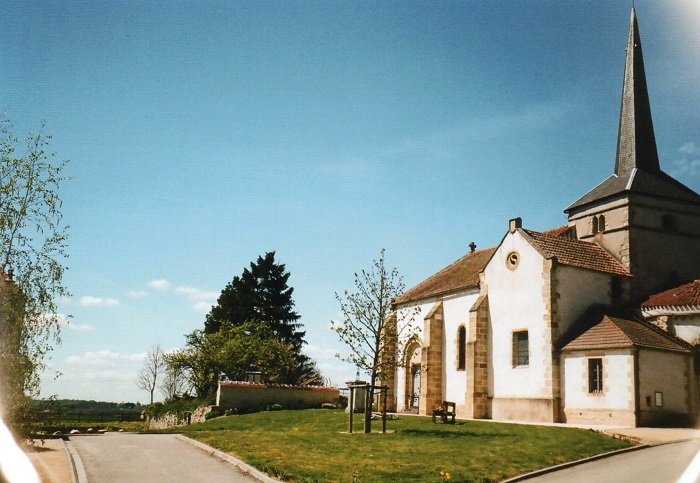
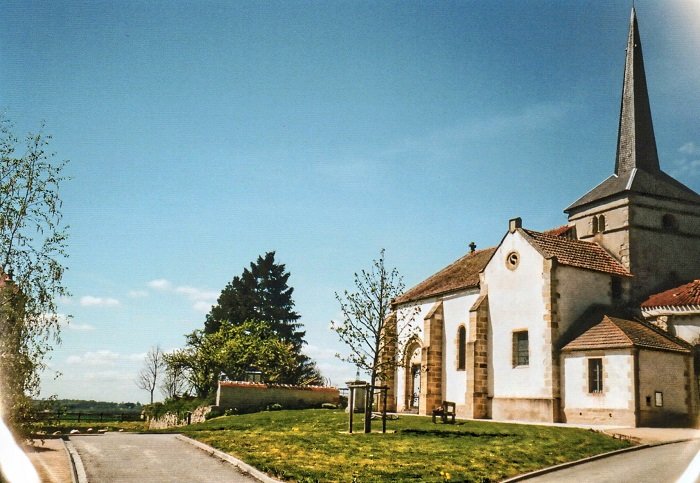
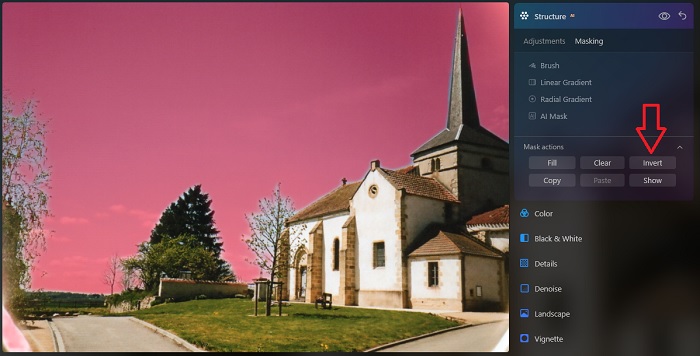
In the example photo, the Mask AI has spotted sky, flora, architecture, natural ground, and man-made ground. I’ve clicked on architecture and man-made ground. And Luminar NEO has highlighted the church and the road in red. <img class=“aligncenter wp-image-771391 size-full” src=“https://expertphotography.com/wp-content/uploads/2022/05/Luminar-Neo-Review-Mask-AI-Church-Red.jpg" alt=“Screenshot in Luminar NEO with church and road highlighted in red by the mask AI tool” width=”700″ height=”363″ /> The Mask AI has accurately identified the elements within the photo. Now we can make changes to those areas without affecting the zones that aren’t highlighted. Now we’ll make some changes to the photo. We want to increase the structure in all areas except the sky. But we don’t need to highlight all the options. We can select the “sky” box in the list generated by the tool. We then return to all masking options and click “invert.” <img class=“aligncenter wp-image-771394 size-full” src=“https://expertphotography.com/wp-content/uploads/2022/05/Luminar-Neo-Review-Mask-AI-Church-Sky.jpg" alt=“Screenshot of Luminar NEO with the sky around the church highlighted in red” width=”700″ height=”356″ /> The Invert tool swaps the highlighted area. Previously the sky was highlighted in red. But once you click invert, it changes so that everything except the sky is now highlighted. I’ve increased the structure setting from 0 to 100. This is overkill, but we’ll be able to see the increased structure more clearly in the example. And as you can see, the sky has stayed soft. But we can see more detail in the area identified by the Mask AI tool. The Mask AI tool isn’t perfect. Sometimes it’ll identify the wrong elements, or the lines won’t be exactly right. But overall, it’s very impressive. Photographers have been asking for a tool like this. And Luminar NEO is the answer to their calls. The Mask AI tool is a success. It’s a massive time-saver. And it removes a lot of painful effort highlighting and masking areas by hand. This tool will turn a lot of heads. And many who were undecided on Luminar NEO before will now be queuing up to buy it.
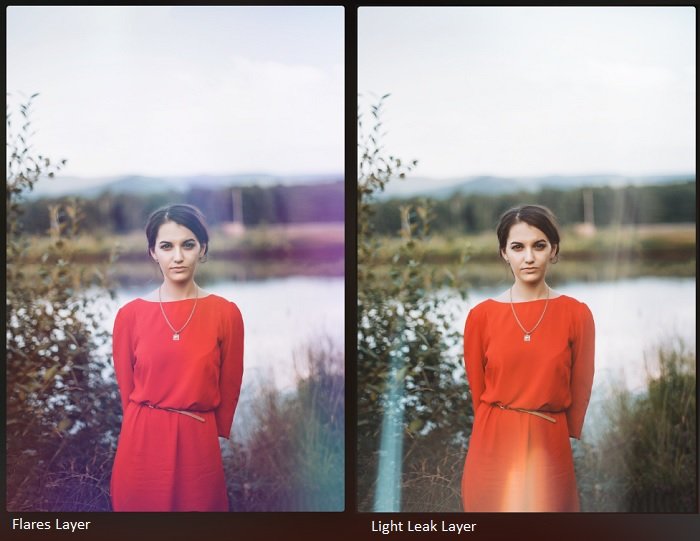
Layers
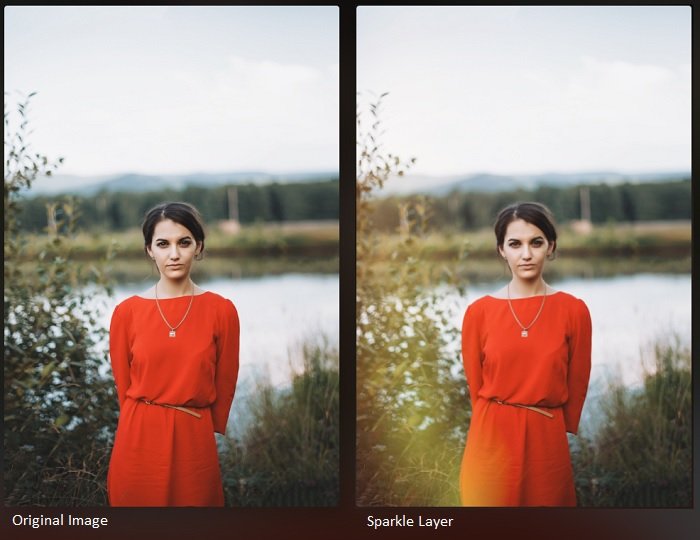
The layers have significantly improved with the new updates. And the masking AI tools with extra features make the layers a huge selling point for Luminar Neo. It’s a departure from their previous products. And they’re taking on Adobe Photoshop in the image manipulation arena. When you click on the layers option on the left side of the Luminar NEO interface, you’re given a list of layers you can add. You can add these layers to your images for cool effects similar to the presets. The layer options include light leaks, flares, and starburst bokeh. You can see some of the options in the images below.
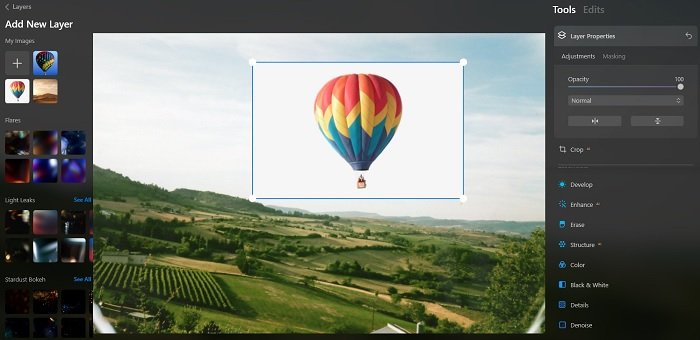
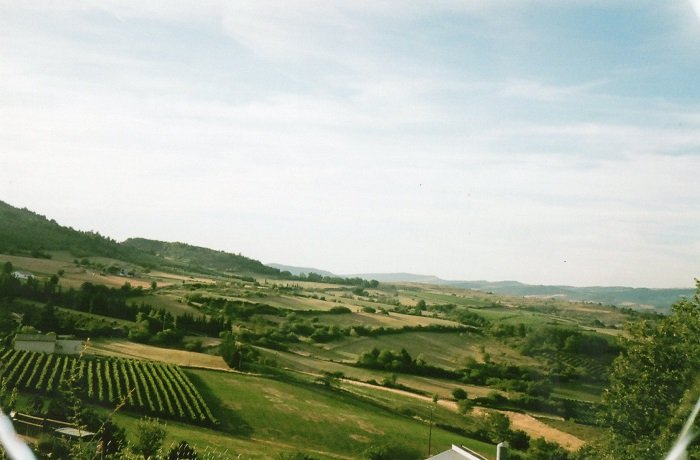
But the Layers tool is now much more than just a collection of filters. You can create composites and add extra elements to your images. We’ve taken a standard landscape photo and added some hot air balloons to make the scene more interesting. We’re using a PNG file of a balloon. But you can also use a JPEG file. You click on the “plus” box to add a new layer, select the file from your library, and then it uploads to Neo. The image will load at 50% opacity. We’ve increased that to 100%, but you can adjust it as you need to.
We erased the outer parts of the layer. They were plain white, and we didn’t want that in the final image. We used the Brush tool, but the Mask AI will help you if it’s a big job. Resizing the layer is straightforward. You can click and drag the corners and edges of the layer to make it bigger or smaller. And you can drag it into position on the lower layer. We added, resized, and positioned the two balloons. We then added a bit of film grain so it matched the original photo. And we enhanced the golden hour effect, making the lighting more appropriate. We then added one of the stock layers from the Neo collection. We used one of the light leak layers with 65% opacity. This gives the image the look of an old film photo, faded by the sun.
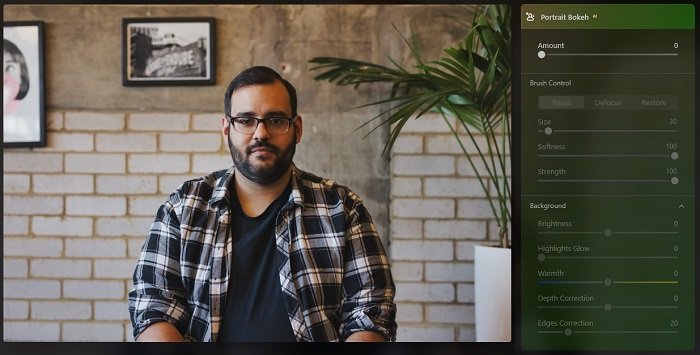
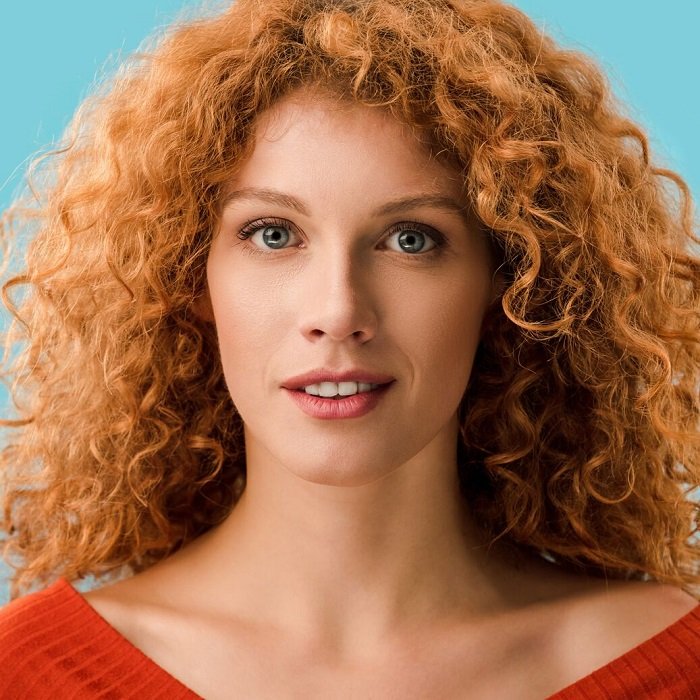
Portrait Bokeh AI
Bokeh is a great effect on portraits. But sometimes, you can’t get it right from just your camera settings. It used to be a laborious task to add it in post-production. The Luminar NEO Portrait Bokeh AI tool wants to save you the trouble. We’re using a standard portrait. There’s minimal bokeh effect in the original image, and there’s plenty of detail in the background.
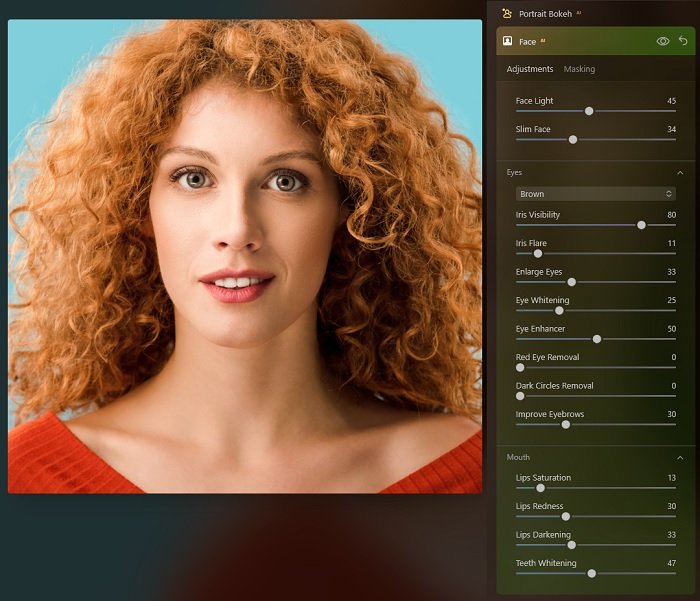
As we’ve come to expect, the Portrait Bokeh AI tool has a simple control panel. You have the brush option if you want to add the bokeh manually. But we’ve used the automated AI. We’re happy with the result. The detail in the background is now blurred and unfocused. But our subject has remained sharp and crisp. Even the outer lines of the subject stayed sharp and clearly defined.
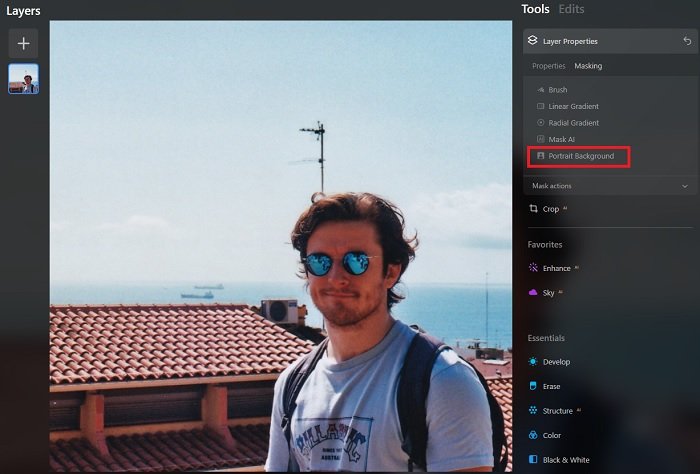
Portrait Background Removal AI
The portrait background removal AI has been one of the most eagerly awaited features in Luminar Neo. Skylum users were disappointed not to see it in the original release. And there was further disappointment when it wasn’t part of the May 2022 1.0.6 Neo update. But Skylum has kept its promises and has again delivered. And we’re all relieved and pleased to see the portrait background removal AI has made it to the Neo 1.1 update. You’ll find the new Portrait Background Removal tool in the Layer Properties command box. Open the Masking tab, and you’ll see an option for Portrait Background. Click on it, and the AI engine gets to work.
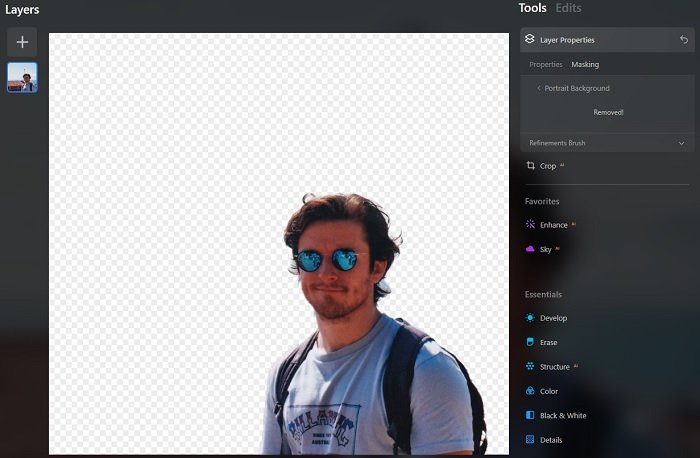
The AI takes a few seconds to evaluate your portrait, and I mean a few seconds. Once it’s had a good look, you’ll have the option to remove the background. Click “Remove” and the background is gone, leaving only your subject behind.
The AI has done a good job. But it’s not perfect. There are still some areas close to the subject where I had to remove the background manually using the Brush tool. I cleaned up the area around my subject’s hair, making the layer transition a bit smoother. Other than a few wisps of hair, there was very little to do with the brush. This will be a massive time saver for many photo editors. Like many tools in Luminar Neo, they’ve turned a once laborious task into something simple. And we’re pleased with the level of accuracy from the AI removal. With the subject isolated, the background is a blank canvas. You’re now free to add any background you prefer. Import your background picture as a new layer, and place the new image as the lower layer. Simply drag the layer icon above the portrait layer on the left side of the screen. Adjusting the layers so the lighting and quality match can take some time. But the background removal AI tool works well. It’s fast and accurate. And it allows you to make massive changes to portraits with a few simple commands. Many photographers will be disappointed to know that the Portrait Background Removal AI only works with human subjects. It doesn’t recognize animals or objects. We know this is an inconvenience for animal and product photographers, so we hope the AI is updated later.
Face AI
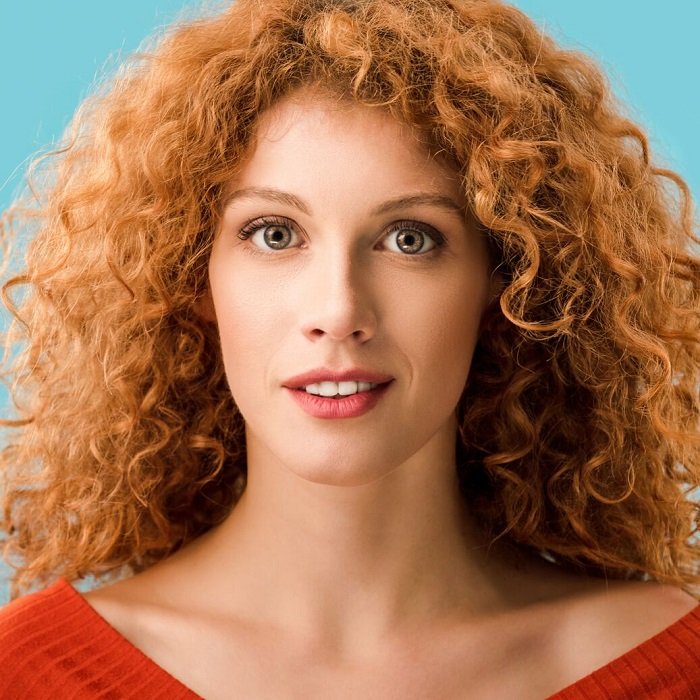
The Portrait Bokeh AI isn’t the only way to improve your portraits with Luminar Neo. Like Luminar AI, you also have Face AI tools. You can lighten the face, enlarge the eyes, or slim the cheeks. And you can do it all with simple slider controls. We’re using a standard close portrait of a woman as our sample image. And we’re going to use the Face AI tools to make some adjustments. We’ve enlarged the eyes and reddened the lips using the face AI. We’ve made the face slimmer using the slider controls, so the eyes are even more accentuated.
If you don’t like the color of your model’s eyes, you can change it. The face AI tool allows you to change the eye color with the click of the mouse. Select the color you want, and that’s it. The results are very good. The colors are subtle, and it retains the detail of the iris, making the color change look natural. We’ve gone over the top with the adjustments for the sake of the example. But the face AI tool can make subtle changes that can make a good portrait great.
Relight AI
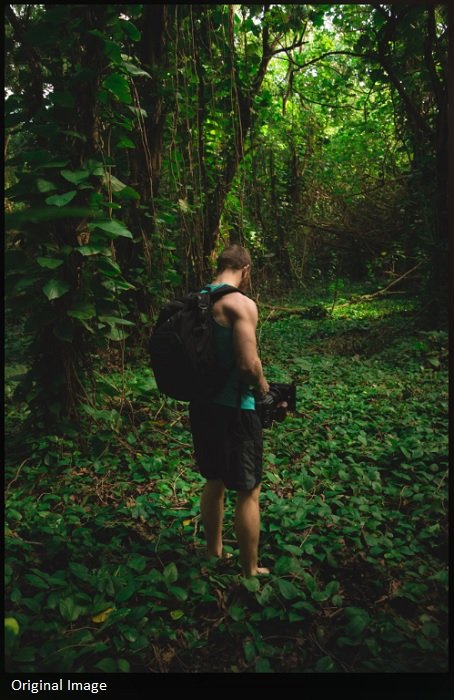
The Relight AI tool is excellent for changing the atmosphere of your photo. When you’re shooting outside, you can’t always get the lighting you want. You often have very little control over the lighting situation. But the Relight AI tool gives you control. We have a picture of a man filming in the jungle. The light is fairly consistent throughout the image. There isn’t a big difference between the foreground and the background. We’ve used the relight AI tool to create a bit more atmosphere. The part of the jungle that’s further away is darker, while the man has more illumination. The tool works well. The changes are applied quickly, and the quality of the image isn’t damaged. The only problem is the lack of area control. There are only near and far brightness controls. Something more manual would be nice. The relight AI also works best when your image has a human subject. Without a definite subject, the tool has little impact and leaves the image looking flat.
The Presets
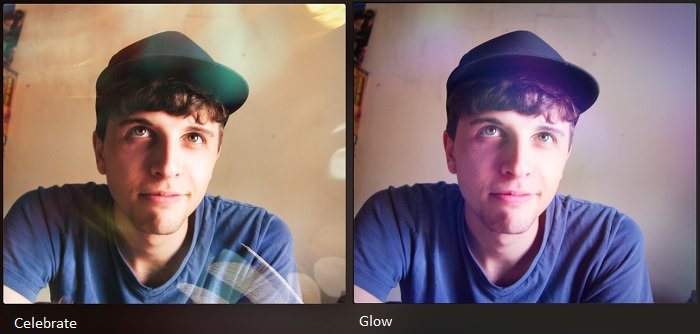
The presets found in Luminar NEO are similar to the templates in Luminar AI. The presets are less of a headline act in Neo. But they work in much the same way. And they’re excellent for adding flavor to your photos. When you upload your photo in the edit section of Luminar Neo, you have the preset options in the top right corner. The AI engine will evaluate the image and select appropriate presets. There are plenty of options, so you’ll find something to suit your style. You apply the presets with one click, just like Luminar AI. But now, you can adjust the intensity with the slide control bar. We’re using a basic landscape image to start our dive into the Luminar NEO presets. The photo has nice colors and different textures to help us see the difference the presets make. We’ve chosen the preset Clean Light from the Easy Landscapes collection. It’s a good example of how a preset can change the atmosphere of your photo. And there’s no adjustment fiddling. Just select the one you want and Neo applies it. The presets will give Luminar NEO a big appeal in the world of social media stars and influencers. So we’ll check out how the presets work with portraits. We’re using a basic portrait, which is fairly close-cropped. It’s the perfect canvas on which we can apply the presets. The first one is Cold Frame preset from the Experimental collection. Here are a few more examples of how you can spice up your photos. We have two more presets from the Experimental collection. They’re all one-click fixes for bland and uninspiring photos. These will definitely spice up your social media content.
What are the Alternatives to Luminar Neo?
Luminar AI
Luminar Neo vs. Luminar AI is a hot topic right now. Many people think that Luminar NEO was made to replace Luminar AI. But that’s not what Skylum wants you to believe. There is a large amount of overlap between the two products. They are both programs powered by artificial intelligence. Their features are similar and, in some cases, the same. But as Neo’s updates arrive, we’re seeing a bigger distinction between the two. Skylum wanted everyone to know that Luminar NEO would solve the performance issues found in Luminar AI (that we also addressed in our Luminar AI review). And we’re happy to say that the new core engine works well. We’ve experienced fewer glitches, and the effects are applied in a fraction of a second. The features from the latest update have put Luminar NEO out in front. The Mask AI and the layering tools have taken Neo to a different level. Now it appeals to far more photographers and editors than before. And Portrait Background Removal AI tool is another step in that direction. In an ideal world, Skylum wants you to buy Luminar AI and Neo. It’s not a bad idea if you have the budget for it. But if you have to pick one Skylum software, we’d recommend Luminar Neo.
Adobe Photoshop and Lightroom
Adobe Photoshop and Lightroom sit at the very top of the tree. They’re the industry leaders in photo editing and manipulation. Whether you’re doing photo touch-ups or digital collages, their tools are the most sophisticated. Luminar Neo is heading in this direction with its layering tools. And at this point, the layering tools are limited in comparison. The updates have brought improvements, and I’m sure there are more improvements to come. But they don’t match Photoshop in that department. Not yet. Neo only requires a one-off payment. It’s cheaper than Adobe’s subscription-based service. But you’ll have to purchase other Skylum products separately. That means you’ll have to buy again if they release Luminar NEO 2. But Skylum does offer software packages. For a more in-depth comparison, check out our post on Luminar vs. Lightroom!
Luminar Neo: The Verdict
Luminar Neo has finally arrived. We are very pleased to have our hands on the full version of the Skylum software. And we’re not just pleased because it’s arrived after a long wait. At the end of this Luminar NEO review, we’re impressed with the results. Luminar AI impressed everyone with the artificial intelligence tools. But the speed and performance left many photographers frustrated with the image editor. Luminar NEO set out to solve that problem with a new core engine. And we can’t complain. Luminar Neo runs smoothly, and everything is applied quickly. You can remove power lines with just a few clicks. And portraits can be enhanced and adjusted with excellent AI tools. You can even remove a portrait background with one click. Luminar Neo has taken the best features of Luminar AI and improved them. The AI tools look fantastic. And Luminar NEO will save photographers time and money with its AI quick fixes. Now we’ve reached Luminar NEO version 1.1, and all the headline features have been added. We know more updates are coming in the future. But Luminar NEO is already looking like a formidable AI photo editing software. Everyone from influencers to professional photographers will find their life improved once they start using Luminar Neo. You can experience it for yourself with the Luminar NEO free trial. But we think it’s well worth the price. Use Expert Photography’s code EPNEO at checkout for a discount on the newest version of Luminar Neo. For more alternative options, see how Luminar NEO compares to Affinity Photo, and which is best for you, Luminar vs. Affinity Photo!


